Wood for Tables
[et_pb_section fb_built=”1″ _builder_version=”4.22.1″ _module_preset=”default” global_colors_info=”{}”][et_pb_row _builder_version=”4.22.1″ _module_preset=”default” global_colors_info=”{}”][et_pb_column type=”4_4″ _builder_version=”4.22.1″ _module_preset=”default” global_colors_info=”{}”][et_pb_text _builder_version=”4.22.1″ _module_preset=”default” global_colors_info=”{}”]
Best Wood for Resin Tables and How to Use It
So before venturing into my first resin table, I watched so many videos of it and one thing I noted was that walnut was a popular choice. But it isn’t the only choice. So i’ve had a look at whats online and put together some thought on what wood can be used to create stunning and unique pieces of furnitures like resin tables. These tables are not only beautiful, but they are also functional, making them a great addition to any home.
Selecting the right wood for resin tables is crucial for achieving a professional finish (or in the case of us DIYers, a finish good enough to impress our friends). I have a had a look at the best types of wood for crafting these tables, as well as how to properly source and prepare the wood for use.
Key Takeaways:
- Choosing the right wood is crucial for creating stunning and durable resin tables.
- Oak, walnut, cedar and willow are some of the best options for these projects.
- High-quality lumber is essential for achieving a smooth and professional finish.
- Properly preparing the wood, including cleaning, sanding, and filling imperfections, is necessary for achieving the desired result.
- Applying protective finishes, such as wood oils or resin, not only enhances the beauty of the wood but also protects it from damage.
Selecting the Right Wood for Resin Tables
There are many different types of wood that can be used for this project, each with its own unique characteristics and benefits.
Oak: A popular option for furniture making, oak has a rich, warm color and a prominent grain. It’s a durable hardwood that is both beautiful and practical, making it an excellent choice for resin tables.
Walnut: This luxurious hardwood has dark, rich tones and a subtle grain pattern that is both elegant and unique. It’s also a durable wood that is easy to work with, making it ideal for resin table projects.
Cedar: Known for its beautiful reddish tones and distinctive smell, cedar is a popular choice for outdoor furniture. It’s lightweight and naturally resistant to decay and insect damage, making it a great option for resin tables that will be used outside.
Willow: Willow is a softwood that has a light, pale color and a subtle grain pattern. It’s ideal for creating a natural, earthy look and is also easy to work with, making it a great option for DIY furniture projects.
Spruce: This softwood has a light, almost white color and a fine and even grain pattern. It’s well-suited for staining and provides excellent value for those on a budget.
Pine: A softer hardwood that is known for its warm, honey-colored tones and rustic appearance. It’s also easy to work with, making it a popular choice for DIY furniture.
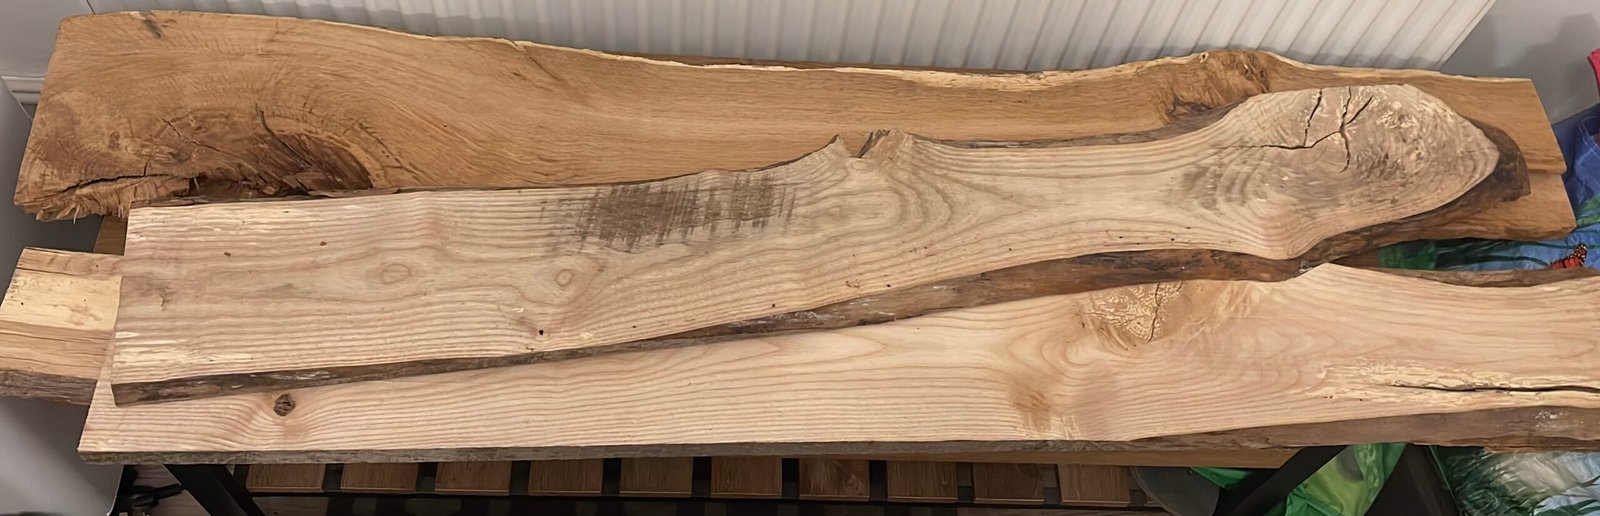
Sourcing High-Quality Wood
Now that you have determined the type of wood you want to use for your DIY furniture project, it’s crucial to source high-quality lumber. Here are some tips on where to source the best wood for your resin tables.
Local Suppliers
One of the best places to source high-quality wood is from local and independent suppliers. These businesses can offer a more personalised service, and they often stock unique and rare types of wood that can give your DIY furniture an extra edge. The timber can be a bit pricey though!
Online Marketplaces
Online marketplaces (facebook, eBay, gumtree) provide a convenient way to source wood for your DIY furniture projects. There are many online stores (representing local suppliers) that offer a wide range of wood types, finishes, and sizes, making it easy to find the perfect match for your resin tables. Review ratings and comments from previous customers to ensure the store provides high-quality wood and reliable delivery services. I’ve used Gumtree and eBay so far and had some lovely piece delivered.
By sourcing high-quality wood, you can ensure that your DIY furniture projects stand the test of time and give your space a unique touch of natural beauty.
Preparing the Wood for Resin Tables
To achieve a smooth, professional finish, proper preparation of the wood is essential. Here are the steps involved in preparing the wood for resin tables:
- Clean the wood: Remove any dirt, dust, or debris from the surface of the wood using a soft-bristled brush or a tack cloth. This step ensures that the resin will bond properly to the wood and create a smooth surface. For live edge wood you’ll need to remove all loose bark and use a rotary wire bit to get all the loose fragments off.
- Sand the wood: Sanding the wood smoothens the surface, filling up any cracks and gaps. Start with a coarse-grit sandpaper and move to a finer grit until the surface is even and smooth. Be sure to sand along the grain of the wood to avoid leaving scratch marks. to give the edges that will bind to the resin the maximal surface area.
- Fill any imperfections or cracks: Use a wood filler to fill in any gaps, but to be honest using resin in these will be just as good. it will really emphasise the natural qualities of the wood.
With proper preparation, your wood will be ready for resin application, and your DIY furniture project will turn out better than you ever expected.
Applying Protective Finishes
When it comes to creating a beautiful and long-lasting resin table, applying the right protective finish is essential. Not only does it enhance the natural beauty of the wood, but it also helps to preserve it for years to come. There are different types of protective finishes you can use, including wood oils and resin, and discuss their application techniques and benefits.
Protective Wood Oils to Use
Protective wood oils are a popular choice for applying to resin tables, as they offer numerous benefits such as:
- Enhancing the natural beauty of the wood grain
- Protecting against moisture and UV rays
- Providing a durable finish that lasts for years
- Easy application and maintenance
Some popular protective wood oils to consider include:
| Product | Benefits |
|---|---|
| Linseed Oil | Provides a natural finish and enhances the wood’s natural grain pattern. Safe for food contact and perfect for indoor applications. |
| Tung Oil | Provides a glossy finish and enhances the wood’s natural colour. Very durable and resistant to water and mildew. |
| Teak Oil | Penetrates deeply into the wood to enhance its natural beauty. Provides long-lasting protection against moisture and UV rays. |
When applying protective wood oils to your resin table, be sure to:
- Prepare the wood surface by sanding it smooth
- Apply the oil in thin, even coats and allow each coat to dry completely before adding another
- Use a lint-free cloth to wipe away any excess oil
I used Rubio Monocoat (which is made from Linseed oil) for my first project, and at 14 months it is still looking great!
Using Resin as a Finish
Another option for applying a protective finish to your resin table is to use resin itself. This is a great choice if you want a glossy, glass-like finish that is both stunning and durable. Some benefits of using resin as a finish include:
- Providing a high-gloss, mirror-like finish
- Protecting against scratches, dents, and water damage
- Easy maintenance and long-lasting results
When using resin as a finish, be sure to:
- Follow the manufacturer’s instructions carefully
- Prepare your work area to prevent dust, dirt, and debris from getting into the resin
- Use a clean, dry brush to apply thin, even coats of resin to the surface of the table
- Allow each coat to dry completely before adding another
By applying the right protective finish to your resin table project, you can ensure that it will not only look stunning but also last for years to come.
Caring for Resin Tables
After investing time and effort into crafting resin tables, it’s essential to take proper care of them. With the right care, your DIY furniture can last for many years, bringing beauty and functionality to your home.
Cleaning and Maintenance
To keep your resin tables looking their best, regular cleaning is essential. Always use a soft cloth and very mild soap or even just water to remove any stains or dirt. Avoid harsh chemicals or abrasive tools that may damage the resin or wood finish. Also, make sure to dry the table thoroughly after cleaning to prevent water damage. Make sure you read the manufacturers guidance on how to maintain the furniture after you’ve applied the various oils.
For maintenance, inspect your resin tables periodically to check for any cracks, scratches or other wear. If you notice any issues, address them promptly to prevent further damage. Depending on the type of finish you’ve applied, you may need to reapply it periodically to maintain its protective qualities.
Protecting the Wood
Wood is a natural material that can be susceptible to damage from moisture, heat, and other environmental factors. To prevent damage, protect your resin tables from direct sunlight, extreme temperatures, and high humidity. Use coasters, placemats, or tablecloths to protect the surface from spills, heat, and scratches.
If you notice any dents or scratches on the wood surface, apply a coat of protective finish to prevent further damage and maintain the table’s beauty. Always follow the manufacturer’s instructions when applying finishes, as different types of woods and finishes require different application techniques and drying times.
Design Ideas for Resin Tables
Creating resin tables allows you to showcase your creative vision with unique designs that transform any space. Here are some design ideas to inspire your DIY furniture projects:
Patterns
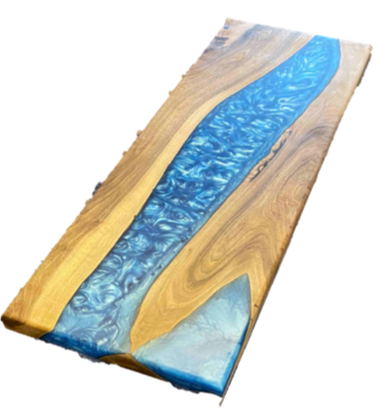
Experimenting with patterns is a great way to add visual interest to resin tables. Consider incorporating intricate or simple designs using different colors and blending techniques. You could try making a geometric pattern by dividing the table into sections and filling them with different colors, or even create an abstract design that flows seamlessly across the surface.
Colour Combinations
Colour schemes and combinations play a vital role in designing beautiful resin tables. You could consider blending different shades of a single color or combining complementary colors to create a bold and vibrant look. Shades of blue and green create a calming and soothing ambiance, while brighter colors like yellow, purple, and pink draw attention and add a playful touch.
Creative Techniques
Get creative with your resin table designs by experimenting with different techniques. For instance, you could try layering a wood slice on top of resin for a natural and organic look or use objects like stones, shells, or even LEDs to create an eye-catching centerpiece. You could also try embedding images or creating a three-dimensional effect by layering objects like dried flowers and leaves into the resin.
Customisation and Personalisation
Personalising your resin tables with unique touches like initials or names make them truly one-of-a-kind. You could engrave a loved one’s name or significant date into the table or create a special piece to celebrate an occasion like a wedding. The possibilities are endless; it’s all about letting your creativity run wild.
With these design ideas, you can create stunning resin tables that reflect your style and personality. Let your imagination guide you, and don’t be afraid to take risks to create beautiful and unique DIY furniture pieces.
Common Mistakes to Avoid
Working with wood and resin requires skills and knowledge that can only be honed through practice and experience. However, the risk of making errors that compromise the quality and durability of your resin tables is high. Here are some of the common mistakes to avoid:
- Failure to Choose the Right Wood: The type of wood you choose is critical to the quality and longevity of your resin table. Avoid selecting wood with knots, cracks, or other imperfections that could weaken or damage the table over time.
- Inadequate Surface Preparation: Whether due to laziness or a lack of knowledge, failing to prepare the wood for resin tables is a common mistake. Sanding the wood and filling any holes or cracks ensures a smooth surface for a perfect resin finish.
- Applying Resin Incorrectly: When applying resin, precision is key. Mixing the resin in the wrong proportions, not allowing the resin to cure properly, or failing to cover the entire surface are some common errors that can ruin the final product.
- Ignoring Safety Measures: Woodworking and resin work can be hazardous to your health. Always wear protective gear such as gloves, safety glasses, and a respirator when working with wood and resin.
- Skipping Essential Finishing Steps: Applying a finish such as oil or wax is an essential step in sealing the wood and protecting it from moisture. Skipping this step can leave your resin table vulnerable to damage and decay.
Avoiding these mistakes will ensure you create beautiful and durable resin tables that will last for years to come.
Finishing Touches and Personalization
One of the best things about making DIY furniture is the ability to add personal touches and make your pieces truly unique. Resin tables provide the perfect canvas for customization with endless options for personalization. Here are some ideas to help you create a one-of-a-kind resin table that reflects your style and personality:
Inlays
Inlays are a great way to add visual interest to your resin table. You can incorporate different materials such as metal, wood, or even crushed crystals and stones into the resin for a truly captivating effect. Popular inlay designs include geometric shapes, intricate patterns, and natural elements such as leaves or flowers.
Engraving
Engraving is another way to add a personal touch to your resin table. You can engrave meaningful words or phrases, family names, or even images onto the wood before placing the resin. To create a crisp, clean design, consider using a laser engraving tool or having a professional do it for you.
Colorful Designs
If you’re feeling artistic, you can create your own colorful resin designs to reflect your personality. Playing with colors, patterns, and shapes can make your resin table stand out and become the centerpiece of any room. To achieve the best results, ensure you properly mix the resin with the right pigments and follow a design plan before pouring it onto your table’s surface.
Natural Elements
If you prefer a more natural look, you can also incorporate natural elements such as flowers, leaves, or even rocks into your resin table. You can also use real branches or twigs for creating a unique table leg or base. The possibilities are endless, and you can let your imagination run wild.
These are just a few ideas to help you personalize your resin tables. The sky’s the limit, and you can be as creative as your heart desires. Remember, the key to unique DIY furniture is to have fun and let your personality shine through.
Showcasing Your DIY Furniture
Congratulations, you have created beautiful resin tables. Now, it’s time to show them off! Here are some tips on displaying and showcasing your DIY furniture:
In Your Home
Resin tables are versatile pieces that can complement any room in your home. Depending on the size and style of your table, you can use it as a coffee table, side table, or even a dining table. Place your resin table in a prominent location where it can stand out. You can decorate it with a vase of fresh flowers or a few decorative pieces to create an eye-catching display.
At Exhibitions
If you plan to showcase your resin tables at exhibitions and fairs, it’s essential to invest in a professional and visually engaging display. Use a tablecloth or backdrop that complements your resin table and adds a pop of color. Consider creating a display that tells a story or highlights the unique features of your DIY furniture.
Through Online Platforms
Online platforms provide an excellent opportunity to showcase your resin tables to a broader audience. Use high-quality photos and videos to showcase the beauty and craftsmanship of your DIY furniture. Make sure to include detailed descriptions and dimensions and offer customization options to meet your customers’ needs.
Remember, displaying your resin tables is an opportunity to highlight your creativity and skills as a DIY furniture maker. Explore different options and find the one that works best for you.
Conclusion
When it comes to DIY furniture projects, selecting the right wood for resin tables is critical. By following the tips and techniques discussed in this article, you can create gorgeous and durable resin tables that will add beauty and functionality to any space. Remember to properly source and prepare the wood, apply protective finishes, and take proper care to ensure your resin tables last for years to come.
Whether you’re a seasoned woodworker or just starting, resin tables are an excellent project to showcase your skills and creativity. By incorporating personal touches and unique design ideas, you can make your resin tables truly one-of-a-kind.
With a little patience, attention to detail, and the right materials, anyone can create stunning resin tables that are both functional and beautiful. So go ahead and embark on your DIY furniture projects with confidence, knowing that you have the knowledge and tools necessary to succeed.
Thank you for reading, and happy crafting!
[/et_pb_text][/et_pb_column][/et_pb_row][/et_pb_section]