Router Sled – Bigger and Better
[et_pb_section fb_built=”1″ theme_builder_area=”post_content” _builder_version=”4.22.1″ _module_preset=”default”][et_pb_row _builder_version=”4.22.1″ _module_preset=”default” theme_builder_area=”post_content”][et_pb_column _builder_version=”4.22.1″ _module_preset=”default” type=”4_4″ theme_builder_area=”post_content”][et_pb_text _builder_version=”4.22.1″ _module_preset=”default” theme_builder_area=”post_content” hover_enabled=”0″ sticky_enabled=”0″]
My first experience with the router sled was actually quite good (DIY Router Sled) but it was time consuming with my trust little Ryobi Trim Router struggling over a few days to deliver a nice milled surface. The frequent battery changes made it very challenging!
What to do? well the option was to buy a planer but they were big and expensive, the other was to buy a bigger router. After looking at multiple different types, I settled on the Trend T7. This was to balance out the need for power, but at an affordable price.
The bigger router meant that a new router sled was needed so I built a new one using the same strategy as last time
[/et_pb_text][/et_pb_column][/et_pb_row][et_pb_row _builder_version=”4.22.1″ _module_preset=”default” column_structure=”1_2,1_2″ theme_builder_area=”post_content”][et_pb_column _builder_version=”4.22.1″ _module_preset=”default” type=”1_2″ theme_builder_area=”post_content”][et_pb_image src=”https://u-ahmed.com/wp-content/uploads/2019/03/IMG_8556-scaled.jpg” _builder_version=”4.22.1″ _module_preset=”default” theme_builder_area=”post_content” title_text=”IMG_8556″ hover_enabled=”0″ sticky_enabled=”0″][/et_pb_image][/et_pb_column][et_pb_column _builder_version=”4.22.1″ _module_preset=”default” type=”1_2″ theme_builder_area=”post_content”][et_pb_text _builder_version=”4.22.1″ _module_preset=”default” theme_builder_area=”post_content” hover_enabled=”0″ sticky_enabled=”0″]
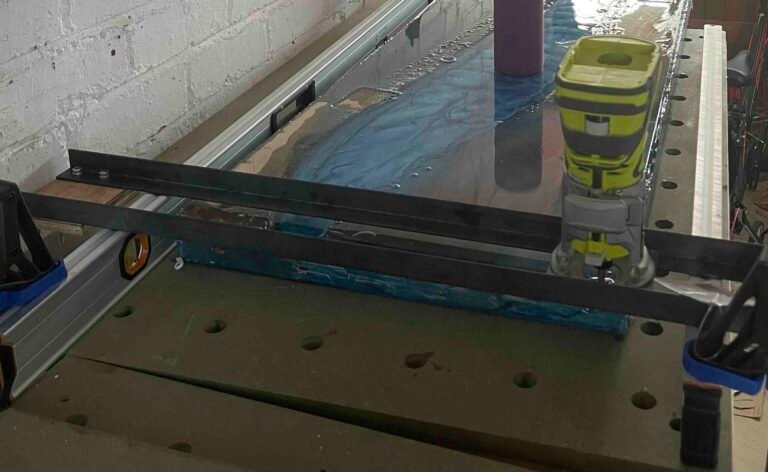
I purchased some slight chunkier angle irons which I got from ebay and some bits of plywood I had knocking around. I figured this woud be the most low profile and robust way to do it.
I cut some 18mm thick plywood to a couple of millimetres more than the router base. I then drilled holes in the wood and the angle iron using size 6mm drill (obviously using material appropriate drillbits). Drilling through the metal I used a bit of 3-in-1 lubricating oil to ensure that I maintained the lubrication and a cooler temperature as recommended. This time though, I drilled some pilot holes with a smaller drillbit first which made it quicker and easier
[/et_pb_text][/et_pb_column][/et_pb_row][et_pb_row _builder_version=”4.22.1″ _module_preset=”default” theme_builder_area=”post_content”][et_pb_column _builder_version=”4.22.1″ _module_preset=”default” type=”4_4″ theme_builder_area=”post_content”][et_pb_text _builder_version=”4.22.1″ _module_preset=”default” theme_builder_area=”post_content” hover_enabled=”0″ sticky_enabled=”0″]
Initially I drilled into the plywood but then drilling into the metal perfectly proved to be a bit tricky so I opted to drill holes into the metal first and then drill through them into the ply. I put the router and shims in and clamped them so that I got the position right.
I secured the plywood underneath (so it then became a stop to sliding off the rails) and used some 6mm bolts/nuts to secure it.
This time though I got some paste wax on the rails to keep it smooth and slidy 🙂
[/et_pb_text][/et_pb_column][/et_pb_row][et_pb_row _builder_version=”4.22.1″ _module_preset=”default” column_structure=”1_2,1_2″ theme_builder_area=”post_content”][et_pb_column _builder_version=”4.22.1″ _module_preset=”default” type=”1_2″ theme_builder_area=”post_content”][et_pb_video src=”https://youtube.com/shorts/fL14Om7658I?feature=share” _builder_version=”4.22.1″ _module_preset=”default” theme_builder_area=”post_content” hover_enabled=”0″ sticky_enabled=”0″][/et_pb_video][/et_pb_column][et_pb_column _builder_version=”4.22.1″ _module_preset=”default” type=”1_2″ theme_builder_area=”post_content”][et_pb_video src=”https://youtube.com/shorts/wfLIkdsZ9x8?feature=share” _builder_version=”4.22.1″ _module_preset=”default” theme_builder_area=”post_content” hover_enabled=”0″ sticky_enabled=”0″][/et_pb_video][/et_pb_column][/et_pb_row][/et_pb_section]